Us disc golfers often refer to different discs as “molds”... But have you ever wondered how an ACTUAL disc golf mold makes a disc?
Our first mold was a suuuper small DIY one that weighed 14 pounds and was used on our garage-made injection machine.
Now, we’re using much larger, much more complicated ones that are mounted to a 225-ton industrial injection machine and weigh over 700 pounds.
In this blog, we’ll break down the key parts of a disc golf mold:
The Core
The Cavity
The Stripper Plate
Special Situations
But first..
What is an Injection Mold?
At its most basic level, a mold is a chunk of metal (usually steel) with negative space inside specifically designed to be filled with a material (usually plastic).
That’s from 10,000 ft.
But if you want to get more in the weeds: there are numerous features that allow for consistency, repeatability, and adaptability.
These include things like
clamping plates which help attach the mold to an injection machine,
water lines that allow water to flow through a mold to help regulate the temperature of the mold,
and ejectors to help remove the plastic part from the mold (usually pneumatic or hydraulic).
The customization options for a mold are seemingly endless as well as the cost, but disc golf molds typically consist of three pieces and cost somewhere in the ballpark of $25,000.
Speaking of the three pieces, that’s where the magic really happens in a disc golf mold 👇
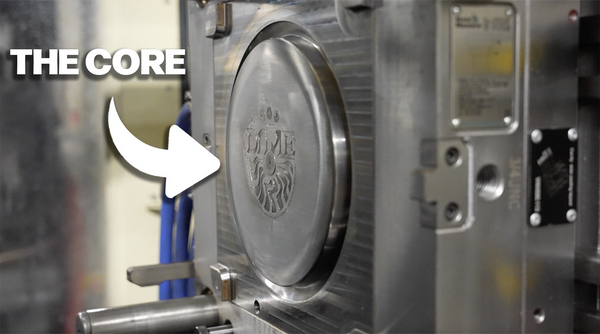
The Core
The core of the mold is central (pun intended) to forming the inner structure of the disc.
It shapes the underside of the flight plate and the inner part of the rim, with the point where plastic flows into the mold (“the injection point”) in the center. On the final product, the core directly influences a player’s grip on the disc.

Outside of that, the core is relatively simple. But at Trash Panda, we like to get extra fancy and engrave designs and add inserts into the core of our molds.
Inserts in the mold are interchangeable pieces that can be used to modify specific features of the disc without redesigning the entire mold. In our case, we have inserts that identify the type of recycled plastic that particular disc is made from, the flexibility rating of that plastic, and the year and month the disc was manufactured.
Interestingly enough, though, the core is only one of two pieces that make up the bottom of a disc.
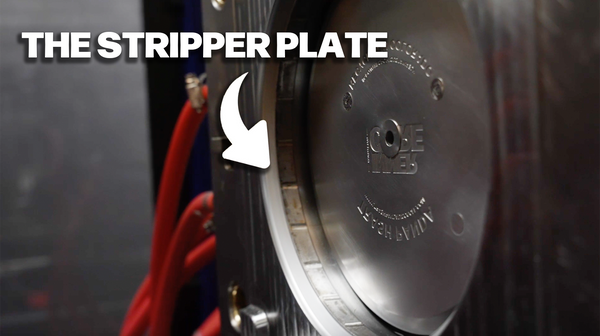
The Stripper Plate
The second piece is designed specifically to help “strip” (or eject) a disc from the mold.
In terms of the final product, the stripper plate only covers the outer, bottom of the rim (think the groove part of a Groove).

Once the plastic has cooled and solidified, the mold opens and engages the stripper plate and ejects the disc from the mold. This component must work smoothly to prevent damage to the edges of the disc, ensuring that each disc comes out with a consistent shape and quality.
Fun fact: the spot where “flashing” can occur on the bottom of a disc’s rim (which many disc golfers are familiar with) is the point where the stripper plate and the core meet.
What about “flashing” on the side of a disc? Well, that’s where the stripper plate meets the third part of a mold:
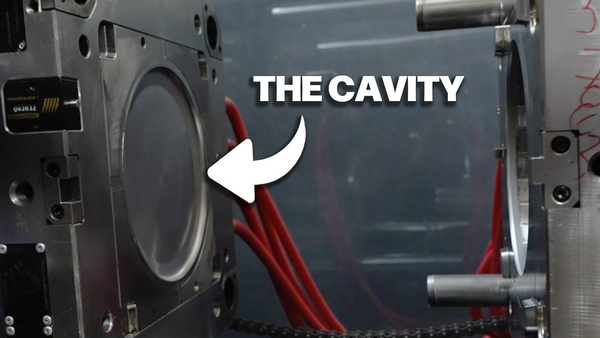
The Cavity
Maybe the simplest part of a disc golf mold is the cavity, which defines the top half of the disc.

On most disc golf molds, it’s a simple design from the leading edge to the center of the flight plate. Some molds, however, increase the complexity of the cavity with features like thumb tracks (think Innova Pigs), golf ball dimples (like the Latitude 64 Missilen), and more.
So in summary, here are the components of a disc golf mold:
The bottom of a disc’s flight plate and the inside rim come from the Core.
The outside, bottom half of the rim comes from the Stripper Plate.
The top half of a disc comes from the Cavity.
Special Situations
Remember when we mentioned the options for a disc golf mold being seemingly endless? Well here are a couple of those modifications we’ve seen from multiple disc golf manufacturers:
The Injection Point is where plastic flows from the machine into a mold. On most disc golf molds is made with a “cold sprue” system - a funky little thing that comes off of the mold with a disc which needs to be cut off. Systems like hot runners, valve gates, and more can be added to a mold to reduce waste and make it so there is no sprue when a disc is ejected form a mold (for reference, check out the bottom of an Inner Core and a Dune when you get a chance).
Speaking of “ejected” - there are multiple ways to eject a disc out of a mold. Most disc golf molds have stripper plates (as outlined above) but some manufacturers have opted for things like air poppets, ejector pins, and more. Here’s a hint: if a disc has a marking you’ve never seen before on the bottom of the flight plate, that’s likely an alternate ejection system.
We know.. We know.. What about OVERMOLDING?!
Overmolding, which has been used by many disc golf manufacturers over the years, is where a disc is made in two stages. First, one part of the disc is made (typically the “core” or flight plate), and then the other part (like the rim) is molded over (get it? overmolding..) the first part. This is a fascinating process that uses two distinct molds and deserves its own blog post.
Each mold is as different as each disc
No two molds are alike and the options are endless.
But they all have one thing in common.. they exist so we can do our favorite thing in the world: throw discs directly into trees and still have the time of our lives.
For a longer-form look into one of our molds, check out the video below 👇


